Sunday, April 10, 2016

ScrapFest In Kitchener

I had such a marvelous time at ScrapFest in Kitchener, ON yesterday! While it was primarily a scrapbook event, a lot of the materials and techniques are transferable to any number of paper crafts, such as artist trading cards and greeting cards.

They had a plethora of free mini workshops. I learned a few things and came home with a bunch of take-aways that I made.

Tags are another popular canvas to create on. This one combined several techniques...painting, stenciling, stamping...to end up with this beautiful tag. The flowers were punched out of card stock, then painted and embellished with a marker. They were applied to the tag with foam dots.

Next came this little embellishment that can be added to a greeting card. The flower was stamped onto card stock, then the co-ordinating die was use to punch it out on a Big Shot. The fancy corners were made with a corner punch and the greeting stamped on. You can't really tell by the photo but the petals of the flower were slightly curled up with a pencil, then a foam dot adheres it to the tag.

This was a really quick and easy project. A bit of Distress Ink applied with a sponge and some rubber stamping with different colours of ink created a very simple but pretty design. it was glued to a kraft bookmark base and a bit of ribbon was added to finish it off.

I learned how to make a little gift bag using heavy-weight scrapbook paper, ribbon, a small circular tag with a word stamped onto it and a bit of glue.

Copic markers and I are never going to be able to work together, at least not in the near future. As lovely as the instructor was, praising my work, clearly I am not skilled at it. It is great to be able to try out new techniques though without investing the money in products that end up not working for you.

Another tag workshop came next. The flowers were flat die-cut spirals that we painted, then rolled, formed and glued into shape. A gem was glued in the centre. The kraft tag was stenciled first, the leaves and flower glued down, and the metallic die-cut greeting added. Some canvas ribbon and string finished this one off.

Here's another interesting project made with heavy-weight scrapbook paper. It is a sleeve or pocket for a gift card. A little bit of glue, a paper doily, a punched out scalloped circle from patterned paper, artificial leaves and flower, along with a hint of bling create a unique and beautiful way to present a gift card for any occasion.

There were long line ups for this mini workshop, and from the end result, I'm sure you can see why. In the afternoon, the crowd thinned out and I was able to get my turn. This Christmas card used a lot of die-cuts and a variety of Distress Ink colours applied with a sponge. It is so simple to do, once you know all the steps and how to put it all together.

For this one, a glossy paper was used. A rubber stamp was coloured with water-based markers then stamped onto the card. I faint background image was then stamped on. The stamped and die-cut butterfly was coloured, and applied with a foam dot.

This small tag was punched out with card stock. The flower was stamped on with Versa-Mark ink. White embossing powder was sprinkled onto it and the heat tool used. Once it cooled down, alcohol ink pens were uses to apply colour to it. I did not realize that you could colour on an embossed image. Add a piece of ribbon and, voila, it's done!

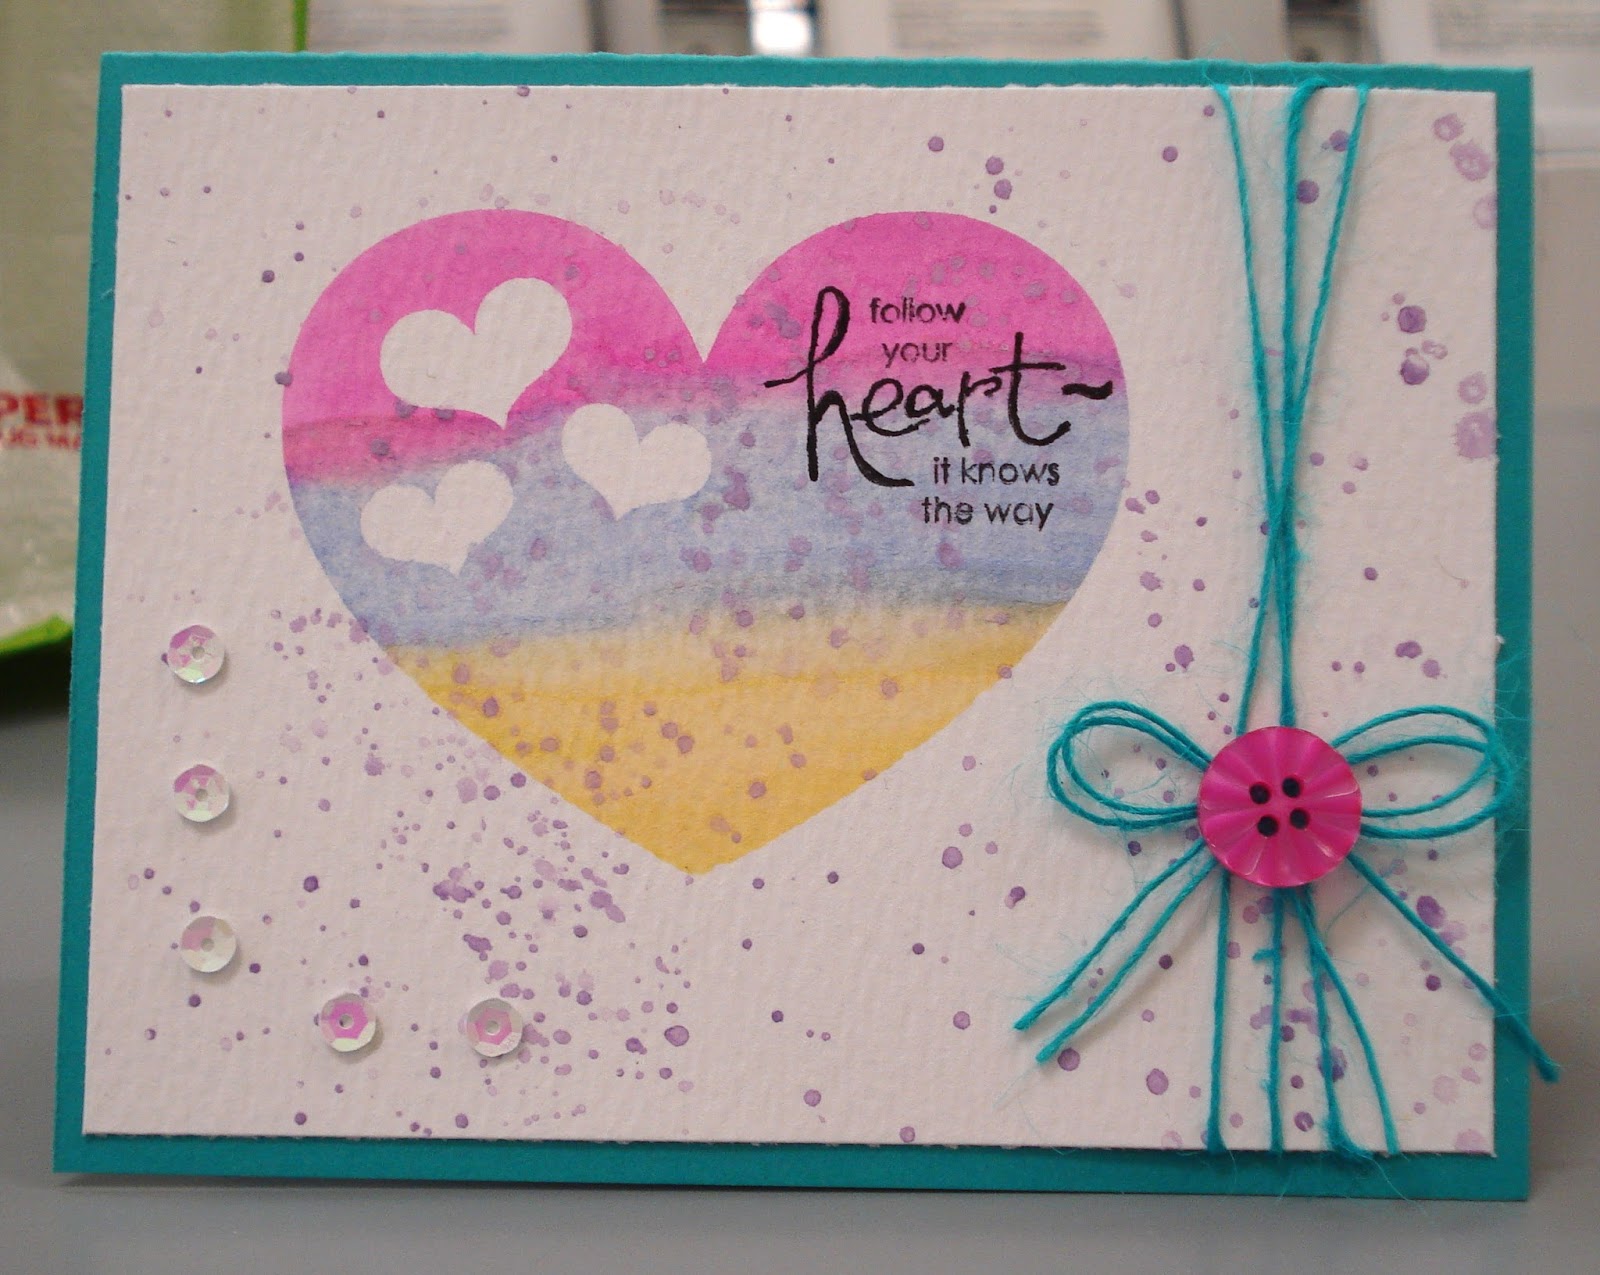
This was the last workshop that I attended. This is on watercolour paper. The hearts were masked off and the paint applied. Once the masks were peeled off, some paint splatters and the stamped sentiment were added. The string was taped on the back and wound around it a couple of times and taped at the other end. A bow was made from the same string and glued down. The button was glued down next, as well as the sequins. The decorated card was glued to coloured greeting card base.

I did not actually end up buying very much at this event but I sure did learn a lot of new techniques and get some wonderful ideas for future projects.

The highlight of the show was getting to spend a bit of time with my friend, Natialie, who was conducting one of the workshops.

I'm already counting down the days until ScrapFest comes to my hometown in September!

Monday, February 29, 2016

Leap Day, 2016

I won't have the opportunity to post on this day (February 29th) for another four years so I thought I should take advantage of it now by looking at some of the customs, traditions and superstitions that are associated with it.

According to an old Irish legend, St. Brigid struck a deal with St. Patrick to allow women to propose to men – and not just the other way around – every four years on February 29th.  This is believed to have been introduced to balance the traditional roles of men and women in the same way that Leap Day balances the calendar.

A man was expected to pay a penalty, such as a gown or money, if he refused a marriage proposal from a woman on Leap Day. In many European countries, the tradition dictates that any man who refuses a woman's proposal on February 29th has to buy her twelve pairs of gloves. The intention is that the woman can wear the gloves to hide the embarrassment of not having an engagement ring. During the middle ages there were even laws governing this tradition.

In Scotland, it used to be considered unlucky for someone to be born on Leap Day. Greeks consider it unlucky for couples to marry any time during a leap year, and especially on Leap Day. In Russia, it is believed a leap year is likely to bring more freak weather conditions and a greater risk of death all around.

How or why some of these beliefs and traditions ever started is lost to obscurity but it was fun looking into some of them on this Leap Day, 2016.

Sunday, February 14, 2016

Artwork Adventures

I thought that it was about time for me to share with you, my loyal blog readers, some of my recent artwork.  The jewellry making supplies have been set aside for now, the knitting needles lay unused in a drawer, and the inkle loom has been idol.

My art form of choice recently has been artist trading cards. I found a new group that strictly trades these little works of art. No random discussion, no confrontation, just trading. And it is a very active group, so I have a binder almost full of artwork from around the globe.

I've been experimenting with a variety of different techniques, styles and materials with varying levels of success. Even the not-so-successful efforts have taught me some important lessons, so it's all good. Here I go with a sample gallery of my recent work, along with simple explanations of the process.


I did a series of these owls for the trading group. The backgrounds are made with hexagons punched from security envelopes, the kind that you get cheques in. The accounting department at work has been saving me all the incoming envelopes and not only have I acquired a lot of used postage stamps, I've utilized some of the interesting patterned paper too.


Vintage photos seem to be quite popular with the artists making cards, so I have taken advantage of some of the old family photos that I have been scanning for my ongoing genealogy project. I simply reduce them in size and print them off for use in my creations.


Acrylic craft paint from the dollar store has been one of my favourite mediums for creating interesting backgrounds. I apply it with brushes, sponges or spray bottles and have used various stencils and tools to create one of a kind backdrops for my cards. Google has been my friend when looking for quotes and sayings to add to my cards.


I have collected a number of paper punches of various sizes and shapes and often use the punched out shapes to embellish my cards. I've printed images, such as this little monster, and fussy cut them to apply to my ATCs. I try to pick images that are not too detailed, they can be a pain in the neck to cut out.


And speaking of used postage stamps, they too have been utilized for my artistic endeavours. My postage stamp mandalas have proven to be quite popular with the trading group.


I have a variety of patterned scrapbook papers that I cut or rip, along with old book pages and magazines that I've used to create unique backgrounds for my work. This one pictured above was done on a piece of 8.5" X 11" card stock, then cut down into ATC size pieces (2.5" X 3") and embellished like the one below.


A printed phrase, punched out star and an acrylic stick-on gem was all this needed to complete it.


A friend and fellow ATC artist provided me with the die-cut windows to create a series of these cards using old Christmas cards as the outdoor scenes.


An old holiday greeting card was used for this one too. I scanned it, then reduced it in size and printed it for this series of ATCs. Mounted on card stock to frame it, with a punched out star and short phrase made these ones quick and easy to make.


I've experimented with a grunge technique using crayons and black craft paint creating a background like a scratch & win ticket. First you colour the entire surface with wax crayons. Then you cover the whole thing with black paint. Once it's dry, you take a coin and scratch away as much of the black paint as you want to get this interesting effect.


I've also used these die-cut windows to make cards that are looking to the inside, instead of the outside. Patterned scrapbook paper, along with a printed image of Mona Lisa and a phrase complete each of the cards in this series.


I've been playing around with embossing powders, rubber stamps, a heat gun and distress ink to add interest and variety to my card backgrounds.


I've even tried colouring a printed image with pencil crayons. Add a couple of punched out butterflies and letters to make the words 'BEST FRIENDS' and you are done!


That brings me to yesterday when I got the bright idea that aluminum foil, something we all have in our kitchens, might be a fun collage element on my ATCs. I was able to achieve a cool textured look by crinkling up the foil. It was fun to experiment with but I won't likely use the aluminum foil very often. As you can see, this card uses a lot of the elements I've already mentioned...vintage photo, printed word. patterned scrapbook paper and a couple different sizes of star paper punches.

So, I've been having a lot of fun with this and the adventure will continue. *smile*

Monday, February 1, 2016

Positive and Negative Impact

On the radio this morning, I heard an interview with a teacher and former student. They were discussing how a teacher could have a long lasting, positive impact on a person’s life.

The former student, now a well known international musician and entertainer, recalled how this teacher had literally pushed him onto the stage that very first time. The boy had been very shy and lacking confidence but the teacher had recognized the immense talent of the youth.

The host of the program asked others to call in who had similar experiences where a teacher had positively impacted the direction of their lives.

While it was a very uplifting and heartwarming interview and story, it got me to thinking about the negative impact that a teacher, perhaps inadvertently, can have on a student. A former creative writing teacher of mine immediately springs to mind.

Even after all these years since high school (and I’m not about to tell you how many), her words still sting. What she said actually stopped me from pursuing the education and career that I was steering towards, journalism and/or novel writing.


Picture this if you will; a naive 16 year old girl with a head full of romantic notions and fairy tale ending. I wrote a ‘love story’ for one of my class assignments. I was quite pleased with myself and thought it was pretty good.

The teacher’s one and only comment was, “You should stick to writing about topics that you know something about.” It was like a huge slap in the face! There was no constructive criticism offered on how to do better next time, no encouragement to try again.

I never took a creative writing course again and did not move forward with the continuing education that I had planned to. And for many years, I did not write ANYTHING, ever, stymied by the thoughtless comment of one person.

To be honest, this teacher probably does not even realize what affect her words had on me. I just hope that she did not dash the dreams and aspirations of any others along the way.

It's only in the last few years that I have rediscovered my love for writing. At this point in my life though, will it take me anywhere? I'm not sure, we'll have to wait and see. 

Saturday, January 23, 2016

People Come, People Go

Throughout the course of our lives, a large number of people come into our lives. Some stay for a long time and others do not but each one of them has an impact on our life, either positive or negative.

And that influence might be transformative, full of joy or sorrow, teachable moments and enlightenment. It might be a single kindness from a stranger or a few words from a friend that changes the course of our lives forever.

What circumstances bring all these people to us? The first, and most obvious ones, our family, our school mates, our neighbours and our teachers. As we grow older, it's our co-workers, service providers (hair dresser, mechanic, bus driver, waitress) and those met by chance at places like the coffee shop or grocery store.

Some people we choose to spend time with, while others are thrust upon us due to circumstances. Each one of them touches our lives in some way, however brief or prolonged that interaction may be. And each one helps to mold us into the person we are today, for better or for worse.

I am grateful to all those who have moved through my life. They have taught me patience and compassion, sparked creativity and interest. They have helped me explore things that I could never have imagined in my youth and taken me to places never seen before.

It's been a wild ride, full of ups and downs, bumps and potholes and forks in the road. Has it been worth it? Yes, it has. I look back with no regrets and look forward with anticipation to new adventures with old friends and those as yet unknown who will join me on my path in the future. Let's get started!