Saturday, March 25, 2017

Bead Soup Blog Party: Bead Hoarders' Edition - Reveal Day

I will admit, when I first received the package of beads from Sally, I had virtually NO idea how or what I would create with them. I had expected to receive only one focal bead, but instead she sent two focal beads and a few extras.

I scoured pages and pages of images on Google and Pinterest searching for inspiration. I did not think I was going to be able to create something that would do justice to these lovely beads and was beginning to panic. Thank goodness, I finally found what I was looking for. 

Once I had the idea in mind, it was time to go to my bead stash to find the co-ordinating beads needed to complete the piece. The idea was to use only beads from your stash and not run out to buy new ones.

i did pretty good. The only thing I had to purchase for this project was the bead caps, as I had none of those. Here is the completed necklace.


I pulled the colour red from the two focal beads for the seed beads used for the bottom portion of the necklace. I used all the beads that Sally sent me for the focal points on either side, and clear cracked quartz and red seed beads for the upper portion.


There are some serious construction flaws in this piece, a few things that I did not clearly think through before plunging into making it. I love how it turned out but will have to go back and resolve those issues before I dare wear it for fear of it falling apart, seed beads scattering all over the floor!

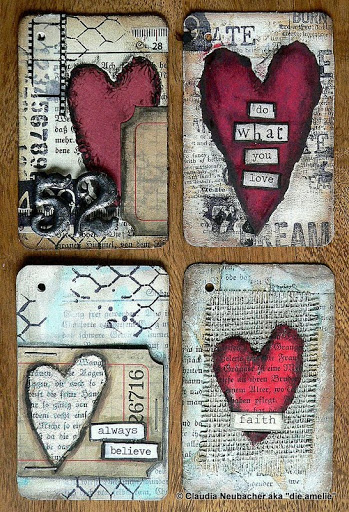
Here is the original inspiration for my creation. It is considerably chunkier that my necklace but follows the same basic structure. 

This was a lot of fun to make, and it was great to reconnect with someone I had been out of touch with for several years. Check out what Sally made with the bead that I sent to her. Click here.

A big thank you goes out to Lori Anderson for hosting this event. Check out the creations of the other participants on her blog. Scroll all the way to the bottom to see all the links.

Friday, March 24, 2017

Heart Art Challenge - Week 10

I'm catching up, I promise. Life tends to get in the way of our crafty ventures sometimes, doesn't it? My intention is to work on Week 11 and 12 over the weekend. We'll see how it goes.


Here is the image that was the trigger for this weeks' design. I certainly have more than enough used postage stamps around here! I acquire them not only from my happy mail but also from work. The accounting department saves them all for me. I've worked there for seven years, so you can imagine how many I've accumulated. I have to find more ways to use them in my art.
Week 10

I kept it pretty simple this week. The hearts were cut out of cardstock and then I glued the postage stamps randomly on them until they were completely covered, trimming away the excess. The tag background was created using my Gelli plate. I inked around both the tag and the hearts to make them stand out. 

To see Bea Grob's Week 10 process video, click here


Bea Grob - Week 10


Sunday, March 12, 2017

Pocket Letters

What is a pocket letter, you ask? I think the original creator, Janette Lane, explains it best...

'I created Pocket Letters™ as a new way to send letters to your new or existing penpals. Basically, you fill all the pockets of a 9 Pocket Trading Card Protector and send the whole page to someone who wants to swap with you. This can be a one-time exchange or you can keep exchanging Pocket Letters indefinitely. You fill the pockets with anything you like (stickers, tea bags, a note, washi tape samples, pictures, etc.) A short note or letter is included and tucked into one of the pockets. Then the Pocket Letter is folded up and sent in a standard 10 size envelope. It's the perfect way to send and collect letters from other Pocket Letter Pals (ie people who are sending mail in this format) around the world and a convenient way to store them. They fit perfectly in a binder!'

You can find more information, some video tutorials and freebies on her blog.

I'll be honest, I was always a bit intimidated by the prospect of creating pocket letters. Some of the ones I'd seen on YouTube and Facebook looked so elaborate. It did not look like anything that I could possibly do.

Fast forward to today...one online video turned my doubt into certainty this week. And here are my first two pocket letters. The empty pockets on the back are where the letters will go.


Pocket Letter #1 - Front

Pocket Letter #1 - Back

Pocket Letter #2 - Front

Pocket Letter #2 - Back

Here is the video that moved me to action. (click here) Rebecca, a fellow Canadian, made it look easy enough for even me to do.

One of these pocket letters is being exchanged with a friend but the other one is available to the first person who would like to exchange one with me. You can let me know by commenting on this post.

Monday, March 6, 2017

Heart Art Challenge - Week 9

The process that I used to make this weeks' Heart Art tag is almost identical to last week. I only did a couple of things differently.


Scrap piece of foam
The first layer was book text. Then, I used a scrap piece of foam that I got at work as a stamp and covered the whole tag. I thought it would create a really cool background.

I pulled out another background stamp to add the next layer. I used music sheet to cut out the heart, gave it a red paint wash and mounted it on cardstock for dimension. I went around the edges of the tag and the heart with the black archival ink.

My Dymo label maker was utilized again for the quote. As a last minute thought, I pulled out a small acrylic heart stamp and archival ink to add the two hearts at the top and bottom.


I'm not particularly fond of the final result. It looks too dark to me. In retrospect, I should have used a red ink pad for the stamping I did with the scrap piece of foam.


Bea Grob - Week 9
 I was originally planning to do more similar tags in the upcoming weeks but have decided that I want to try something different next week. I don't have a definitive plan yet, so stay tuned to see what's coming!

To see Bea's process video for her Heart Art - Week 9 click here.

Wednesday, March 1, 2017

Heart Art Challenge - Week 8


Von Pappe 2 Art
Inspiration from this one came from a blog post that I found while looking for ideas for this weeks' heart art tag. It will also be the inspiration for the next few also. Check it out here


This was a quick and easy project. First step was to adhere book text to the tag. Next came some stamping, paint splatters and going around the edges with archival ink and a sponge applicator.

The heart was also cut from a book text page and given a red paint wash. After drying, it was glued to cardstock to give it a bit of dimension. I used my Dymo label maker to print the quote.

Here are my process photos...

Step 1
Step 2
Step 3
Finished Tag
Bea Grob - Week 8
Here is a photo of Bea's Week 8 heart art with a link to her process video here

I'm planning to do a few more similar tags with quotes over the next couple of weeks. Stay tuned to see them all!