Saturday, February 25, 2017

Bead Soup Blog Party: Bead Hoarder's Edition

Sign up for this event was on January 28th. I'd participated in a few of the Bead Soup Blog hops organized by Lori Anderson a few years back and they were always fun and challenging. I decided it was time to start crafting with beads again.

The idea this time was to go through your hoarded beads (and all jewelry crafters have them), pick out ONE special bead, and send it to your assigned partner. You were to pick the bead, write a nice note and package it up for shipment BEFORE you knew who your partner would be.

As luck would have it, my randomly selected partner Sally is someone that I already know. I was involved several years back in her blog challenge, Focusing on Life, where each participant would post a blog every week on a pre-determined theme.
I had to drop out of the challenge in the middle of the second year, due to health reasons and other life complications. It's been wonderful to re-connect with her through the Bead Soup Blog Party. We exchanged e-mails, agreeing to stick to the ONE bead rule (while it was obvious that many others were sending much more) and I popped hers in the mail.

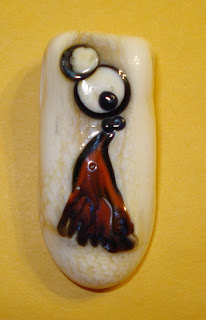
Here is what I sent to Sally. This lovely goddess bead was made by my friend, Louise Ingram. I'd purchased a number of lampwork beads from her over the years to make into necklaces and sell at events. Now that I am no longer able to do that, quite of few of these lovelies have been languishing in my bead stash. Each one is different, and each one is beautiful.


Both Sally and I have received our packages and can begin to ponder what to create with them. I knew I was in trouble, however, when I read her note before opening the package inside the envelope. It began, 'I know that we agreed by e-mail to only send ONE bead but...'. She sent more than one bead because 'she could not break up the set'. 

The lovely round beads are the size of marbles, handmade and perfectly amazing. I have a vague idea what I want to do with them but we will see how it ends up. The blog hop is on March 25th, so I have a bit of time to try out a few options and complete my piece. And I cannot wait to see what Sally does with the goddess bead that I sent to her.

Sunday, February 19, 2017

Making ATCs - With Cat Hand

I watched this video last night by Cat Hand. Click here to watch it. It inspired me to try the technique myself today. I did not have the same materials and modified the process slightly but basically followed the steps as she laid them out.

Step 1: Use Mod Podge to glue down book text, music page and other miscellaneous papers to a piece of kraft chipboard.


Step 2: Put down some different colours of paint randomly onto the page. Cat Hand used Dylusions paints but I only had regular acrylic paint in tubes at my disposal.


Step 3: Add some torn strips of patterned scrapbook paper. Cat Hand used strips of leftover painted papers.


Step 4: Use bubble wrap and white paint to add another layer. Cat Hand used a brayer to apply the white paint.


Step 5: Use archival ink and a background stamp to add more interest to the page.


Step 6: Cut into ATC size cards. You will get nine from a standard 8.5" X 11" piece of chipboard, with a few small bits left that you can use in other projects.


Step 7: Add torn pieces of patterned tissue paper to each card. I did not have any, so I stamped a bunch of random stamps on plain white tissue and used that.


Step 8: Use Mod Podge to adhere a small stamped image and heart to each ATC. Cat Hand stamped her images onto book text paper but these stamps got lost on it, so I used plain copier paper and archival ink.


Step 10: Add a word or phrase (I used Tim Holtz ChitChat stickers) and I outlined the hearts and words with a fine line black marker. To finish them off, I used black ink around the edges to frame them.


The whole process took most of the day. A lot of time was spent waiting for layers to dry. I did speed it up a bit with my heat tool when my patience had run out.

These turned out pretty good, if I do say so myself, and I can see myself using this technique again. Thanks, Cat Hand, for a fun project on Family Day weekend!

Friday, February 17, 2017

Heart Art Challenge - Week 7

Simplicity is Beautiful
As so often is the case, my initial inspiration for this tag came from a video that I watched on YouTube: Nicoletta Zanella's 'Mixed Media Tag: Simplicity is Beautiful'. And once again, the finished tag that I made only superficially resembles the tag she created in the video. I tend to go off in my own direction though, don't I?

I began by tearing up a couple of old book pages and collaged them onto the tag with Mod Podge. When that had dried (which seemed to take FOREVER), I brought out the turquoise and daffodil yellow craft paint, mixed them with a bit of water and applied it to the tag. You can see that I'm already starting to stray from the one in the video but you expected that. 

I decided to use two small bottle caps and the edge of an old gift card to add some random circles and lines to the tag with black paint. You will notice a couple of OOPS though, blobs and streaks of paint that ended up there by mistake (circled in red). But as Carolyn Dube says in her videos, 'An OOPS is nothing more than an Outstanding Opportunity Presenting Suddenly'. So, a 'mistake' becomes a 'unique design element'. I like how that lady thinks.

I also used my new fan brush and black paint to add some splatters. I think that I almost have the correct ratio of paint and water to do that the way I want to. I'm sure I will get it right sometime along the way if I keep practicing.

Next comes the focal point, the hearts, because this is a 'heart art challenge' and would not be complete without a heart or two. I was going to cut them from a gelli print that I recently made but the prints were too busy for an already busy background. I ended up using some plain pink cardstock for them.

Before I adhered them to the tag, I brushed on a coat of matte medium to seal it. I'm not terribly happy with the final result but it was fun to make and I guess that is all that really matters. I did try a couple of new techniques and learned a thing or to, so it's all good.

Bea Grob - Week 7
To watch Bea's Week 7 process video, click here. Like me, she seems to be trying new materials and techniques every week. This is going to be an amazing year!


Tuesday, February 14, 2017

More YouTube Favourites

I keep finding more fabulous YouTube channels! I could spend hours watching videos but I've had to limit my viewing time or I would never get anything else done. I swear, I think that I'm addicted!

4"X 4" canvas by Shel C
My newest discovery is Shel C - PaperOcotilloStudio. I am loving a lot of her process videos. She creates art journal pages, mixed media canvass art, altered tags and more. She is also one of the owners of the Facebook page, 'Pick A Stick Challenge'. It is a group for art journalers with a monthly challenge designed to stretch your creative comfort zone by giving you 10 steps to follow, randomly chosen at the beginning of each month. Artists can interpret them any way they like but you must follow the steps in the order listed. I have not yet been brave enough to attempt one of the challenges.

Bea Grob
Of course, I'm following Bea Grob and have joined in on her weekly Heart Art Challenge. There is a companion Facebook group also, FaceTheScraps, where you can see what others are doing for the challenge. We are on Week 7 now, and I'm having a lot of fun with it.

Nicoletta Zanella
Another recent addition to my subscription list is Nicoletta Zanella - Inspired by My Art. Her art journal pages and tags have really provided me with a lot of inspiration for future projects. She does some guest posts for various blogs, like this one for Faber-Castell and you can see more of her work on Flickr.

Every night, before I turn out the light, I am watching YouTube videos on my tablet. The one thing that I have to be careful about is that I don't end up spending more time watching videos than I do creating art. And I have to get some sleep too.

Saturday, February 11, 2017

Heart Art Challenge: Week 6

Last year, I joined a Facebook group called Mixed Media Morsels. It is a companion to a video series created by CatHand to share mixed media techniques in small bites. I learned so many new ways of creating in the mixed media style without being intimidated by the enormity of it. Accepting the fact that there is no right or wrong way to create art was the biggest key to growth.

This year, her videos are entitled 'Mixed Media Morsels: Main Dish' taking the techniques learned in 2016 and combining them on a larger scale as art journal pages. This is where the idea came for my heart art tag this week. To see the Main Dish 2 video, click here.

Since I'd made so many tag backgrounds while playing with my Gelli plate last weekend, I decided to use one of them for my tag this week. 

I picked up a fan brush at a local art store yesterday. It seems to be the tool of choice for adding paint splatters to your work. I still have to find the right combination of paint and water to get the subtle effect I was looking for. My resulting splatters this time were anything BUT subtle. No worries, just another learning experience on the journey.

Next, I cut out a large heart from copy paper. I tore up small bits of pink and white patterned scrapbook paper and glued them randomly onto the heart. I trimmed off the unnecessary bits and used a sponge to ink the edges with black archival ink. The edges of the tag were done also.

I adhered the heart to the tag and coated the entire thing with a generous coat of Mod Podge to seal everything together. 

I used my new stamp and die set to make the butterfly. I auditioned several different colours before settling on the turquoise butterfly. The other colours I tried did not 'work' at all. To give the butterfly a bit of dimension, I glued a piece of chipboard to the back to raise it a bit off the tag. The words 'Butterfly Kisses' were done on my Dymo label maker. 


I am experimenting with so many new techniques and learning a few things along the way. Most importantly, I'm having fun! 

Here is Bea Grob's card for Week 6. To see her process video, click here. Stay tuned for Week 7.


Thursday, February 9, 2017

Art Everywhere

Wherever I am, being surrounded by art makes me happy. I even have art displayed in my small cubicle at work. My heart art tags adorn the walls and I have several ATCs on mini easels on my CPU and desk.

Here is where I spend my weekdays, Monday to Friday, from 8 a.m. to 5 p.m.

You can see my heart art challenge tags are prominently displayed on the wall. By the end of the year, there will be 52 tags hanging there. I hope that I have enough space for them all!


I also showcase several ATCs around my workspace, alternating them with new ones each week. Currently displayed are a set of cards I traded for with someone in Dubai. I love all the detail and the texture on these cards.


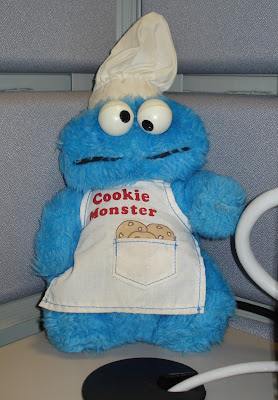
And yes, that IS Cookie Monster you see sitting off in the corner. He was gifted to me by a fellow employee after I wore a fluffy blue scarf to work one day that was exactly the same colour.


Saturday, February 4, 2017

Heart Art Challenge: Week 5

I am enjoying the process each week of making a new heart art tag. I search for inspiration everywhere. I like to try out new techniques and materials. This time I the idea was sparked from a picture found online. It's very busy and colourful, isn't it? The end result, as always, is quite different from original concept. But there is no right or wrong way to create art.
I decided to take out my Gelli plate and craft paint to create the background. I actually did eight tags in total, experimenting with different colour combinations. I have a tag swap that I signed up for so the extras will come in handy.

This morning, I watched an awesome video on YouTube on the Shel C. PaperOcotilliStudio 'Tags From The Desk - Puppy Love for February'. I can see me making my swap tags using similar techniques, as well as, a future heart art tag.

But back to this weeks' heart art tag. The colours on this one are turquoise and bright yellow which blend into a pretty green shade. After it dried, I used some archival ink to stamp on some swirls. I also used a sponge to ink the edges of the tag. 
I punched the hearts out of the scrap paper that I used to clean off my brayer after each application of paint onto the Gelli plate. The edges of each heart were individually inked with a sponge and the archival ink. I used black thread to 'hang' some of the hearts from. A finishing coat of Mod Podge was the last step. The tag has a nice, glossy shine to it.


I'm very happy with how this one turned out. To see Bea Grob's process video for her heart art card for week 5, click here
Now, to start thinking about next weeks' tag. Where will I look for inspiration this time?